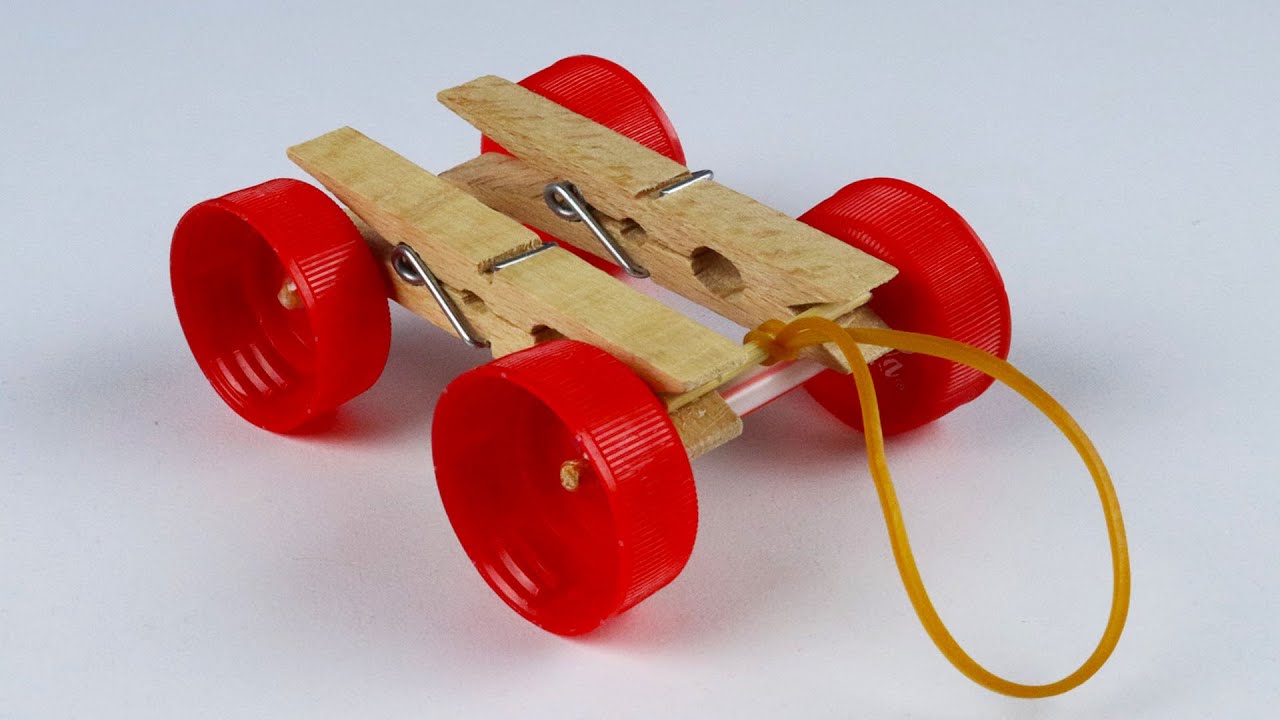
Building a rubber band-powered car is a simple and entertaining science project that demonstrates several important principles of physics and engineering. With a few inexpensive household materials, you can create a small vehicle that moves without batteries, fuel, or an electric motor.
The project is especially useful for students because it combines creativity with practical lessons about energy, motion, friction, force, and mechanical design. Even though the finished car may look simple, changing the size of the wheels, axle, body, or rubber band can dramatically affect how far and how fast it travels.
What Is a Rubber Band-Powered Car?
A rubber band-powered car is a small vehicle that uses the stored elastic energy of a stretched or twisted rubber band to turn its wheels.
When you wind or stretch the rubber band, you store potential energy in it. When you release the mechanism, the rubber band attempts to return to its original shape. That stored energy is transferred through an axle to the wheels, causing the car to move forward.
This makes the project a simple example of how stored energy can be converted into mechanical motion.
Materials You Will Need
You don’t need specialized equipment to build a basic model. Common materials include:
- A piece of lightweight cardboard or foam board
- Four wheels, such as bottle caps or small toy wheels
- Two straight wooden sticks or skewers for axles
- Four short pieces of straw
- One or two rubber bands
- Tape or glue
- Scissors
- A ruler
- A pencil
- A small hook or paper clip
The exact materials aren’t important. The goal is to create a lightweight frame with freely rotating wheels and a rubber-band mechanism that can drive one axle.
Step 1: Build the Car Body
Start by cutting a rectangular piece of cardboard or foam board for the chassis.
Keep the body relatively light. A heavy car requires more force to accelerate, while an extremely flexible body may make the axles difficult to align.
You can experiment with different shapes later, but a simple rectangle is ideal for a first attempt.
Mark two positions near the front and rear of the chassis where the axles will be installed.
Step 2: Create Axle Supports
Cut two pieces of drinking straw slightly wider than the car body.
Tape or glue the straw pieces underneath the chassis so they run parallel to each other.
These straw sections act as bearings or guides for the axles. The important thing is to make sure they are straight and parallel. If one is angled, the wheels may rub against the body or the car may turn instead of traveling straight.
Allow the glue to dry before continuing.
Step 3: Install the Axles
Push a wooden skewer through each straw.
The skewers should rotate easily inside the straws. If an axle feels tight, check whether the straw has been squeezed or bent.
The wheels will eventually be attached to the ends of these axles.
At this stage, spin each axle with your fingers. It should turn smoothly with minimal resistance.
Step 4: Attach the Wheels
Bottle caps can make convenient wheels for a simple homemade car.
Make a small hole in the center of each cap and push the caps onto the ends of the axles. Secure them so that they don’t slip off, but don’t attach them so tightly that the axle can no longer rotate freely.
Try to keep all four wheels approximately the same size.
Wheel alignment matters. If the wheels are tilted or positioned unevenly, the car may wobble or veer to one side.
Step 5: Add the Rubber Band
The rubber band is the engine of your model.
Attach one end of the rubber band securely to the front of the chassis. The other end should connect to the rear axle or a small hook attached to it.
When the rear axle is rotated, the rubber band twists around it. This stores elastic energy.
When you release the axle, the rubber band begins unwinding and turns the axle in the opposite direction, driving the wheels.
Make sure the rubber band is secure before testing the car.
Step 6: Wind It Up
Place the car on a smooth, flat surface.
Hold the car steady and rotate the driven axle backward so that the rubber band winds around it.
Don’t wind the rubber band excessively. If it becomes overstretched, it can break or damage the attachment points.
Once you’ve wound the axle, place the car on the floor and release it.
Watch what happens.
How Does the Car Move?
The physics behind the project is surprisingly interesting.
When you twist the rubber band, you store elastic potential energy. Once released, that energy is converted into rotational motion.
The axle transfers this motion to the wheels. The wheels push backward against the ground, and friction between the wheels and surface helps propel the car forward.
This is an example of energy transformation:
Elastic potential energy → rotational motion → forward motion
Some of the stored energy is lost through friction, air resistance, wheel deformation, and movement within the axle system.
How to Make the Car Travel Farther
Once your basic car works, experimentation becomes the most exciting part.
Try changing one feature at a time.
A larger wheel can travel farther for each rotation, while a smaller wheel may provide greater mechanical advantage. You can also experiment with different rubber bands, chassis weights, and axle sizes.
Reducing friction is particularly important. Make sure the axles rotate smoothly and that the wheels aren’t rubbing against the chassis.
A lightweight body can also help the car use its stored energy more efficiently.
Why Does the Car Sometimes Turn?
If your car doesn’t travel straight, don’t worry. This is one of the most common problems with homemade vehicles.
Check whether the axles are parallel. Also inspect the wheels to make sure they’re attached straight.
If one wheel is slightly larger or sits at an angle, the car may naturally curve toward one side.
This provides an excellent opportunity to experiment with alignment and mechanical design.
Simple Experiments to Try
You can turn the project into a science experiment by testing different variables.
For example, measure how far the car travels when you use:
- A short rubber band
- A longer rubber band
- Large wheels
- Small wheels
- A lightweight chassis
- A heavier chassis
- Different numbers of axle rotations
Record the results in a notebook or spreadsheet.
Try to change only one variable at a time. This makes it easier to determine which change affected the car’s performance.
Safety Tips
Use scissors and pointed objects such as skewers carefully, especially when children are completing the project. Adult supervision may be appropriate for younger students.
Don’t stretch rubber bands toward your face, and replace bands that show signs of cracking or damage.
Also make sure wheels and small parts are securely attached.
Final Thoughts
A rubber band-powered car is much more than a fun craft project. It is a practical demonstration of energy, force, friction, motion, and engineering design.
The basic model can be built with simple materials, but there are almost unlimited ways to improve it. You can redesign the chassis, experiment with wheel sizes, reduce friction, change the rubber band mechanism, or even organize a competition to see which design travels the farthest.
The biggest lesson is that engineering involves testing and improving ideas. Your first car may not move perfectly—and that’s completely fine. Each problem gives you an opportunity to investigate, make a change, and try again.